
Existing Strata Plan Lot is Subdivided to 2 or more Lots in Strata Master
This article will provide guidance when a Lot has been subdivided, on the steps required to record changes on the existing Lot and add new Lots.
Your circumstance is likely to be different, with different lot numbers and names of course, and perhaps subdivided into more than 2 Lots. You have options, for example, as to how to rename subdivided lots. However the steps listed here are the standard required steps involved.
|
Note that this process has a number of steps, and is quite lengthy, so we recommend you read through it, and plan how you will set up your subdivision, before commencing any part of the subdivision.
Required Steps Summary
1. Process a backup that you can restore to if you make an error - https://kb.rockend.com/help/creating-a-backup-in-strata-master
2. Rename the existing Lot or in another manner, identify that it has been subdivided and is no longer in use.
3. Create the New Lots.
4. Create the new entitlement sets
5. Make the subdivided Lot an additional debtor so it is no longer counted as a Registered Lot.
6. Check that there are no funds owing on the subdivided Lot.
7. Reset the number of Registered Lots on the Corp screen.
8. If you use Group Reporting, check your groups still reflect as required.
Can a Change of Lot Owner Be Done ?
A change of lot owner will continue the same Lot , the same Lot number, with a continuing Ledger. It also then continues to count as a registered Lot. This is not usually suitable for a subdivided Lot.
Subdivision Examples Provided
2 examples will be provided in this article.
1. A simple Lot subdivision where there is no New Plan number involved, and the subdivided Lot is the last listed Lot.

2. A Lot subdivision where there is a new Plan number.
Example 1
Strata Plan 2222 has 5 Lots of which one, the last Lot, was reserved for later division into 2 Lots, still within Plan 2222. It had been retained by the original developer.
Notes
In most circumstances, it would be beneficial to rename the Lot being subdivided. In the example above it may be sufficient to add the words "Subdivided". If the Lot has a natural persons name, you would may prefer to Enter the prior name in the contact details but have the Lot List show simply "Subdivided".
Renaming is done so that other users in the future are fully aware of the current status of this Lot but also that it may have previously been levied prior to subdivision.
Steps to Rename Existing Lot
1. Open the card by double clicking on the Lot.
2. Click the edit button. 
3. Click the edit button in the contact square and edit the contact details as required, in consideration of the Rename the Existing Lot 'Notes' above.

4. The Contact Editor screen opens. 
5. Edit as required. In the example below we have added 'subdivided' to the name and changed the address to the Agency details.
7. Click Save
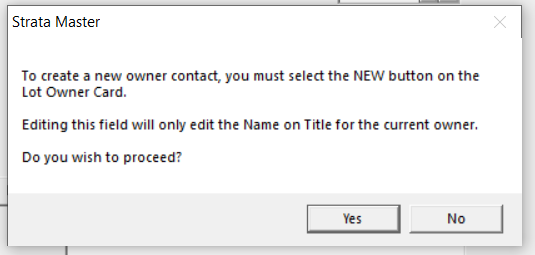
6. You should also have the message below pop up. Because you are changing the name on title BUT this Lot itself is not being sold, click Yes.
7. Click edit again and add - subdivided to the Name on Title field. 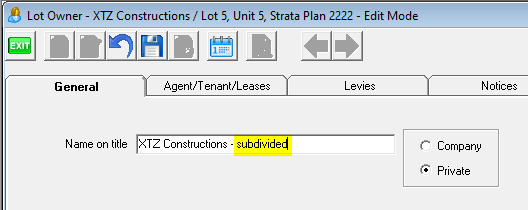
8.Click Save. 
9. Close the Plan and reopen to check that the change has taken.

Creating New Lots and Marking Subdivided Lot as Additional Debtor
Both of these steps are included in the article - https://kb.rockend.com/help/add-an-additional-debtor-in-strata-master
Create New Entitlement Sets
This article shows you how to create new entitlement sets - https://kb.rockend.com/help/creating-additional-entitlement-sets
Note that in this circumstance, where a lot has been subdivided, that the new entitlement set needs to be the Levy Entitlement. So, you can simply edit the existing Levy Entitlement.
1. Once you have created the new Lots, they will automatically appear in the Levy Entitlement set with the amount of entitlement as entered when creating the Lots. You then change the subdivided Lot to 0.00 entitlements.
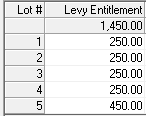 In this screenshot you can see the 2 new Lots entered and the subdivided Lot is 0.00.
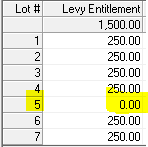
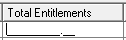
2. Editing the Levy Entitlement Set 'Total Entitlements' to equal the new total. In this example it has increased from 1450 to 1500. Click into the Total Entitlements field, backspace to remove the existing figure, then enter the new figure. .
Click into the Total Entitlements field, backspace to remove the existing figure, then enter the new figure.
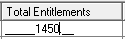 Backspace to remove the existing figure, then enter the new figure.
Then tab out of the field. Ensure the set is still called the Levy Entitlement Set.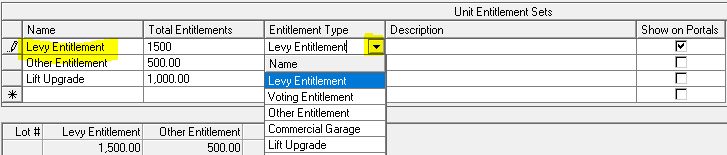
3. You may also want to add an additional entitlement set containing only the 2 new lots if they are to be levied a part levy - https://kb.rockend.com/help/creating-additional-entitlement-sets
Checking For Due Funds on the Subdivided Lot
A quick check of the subdivided lot ledger will show whether -
- the Lot has overdue levies. You will need to determine whether these levies will be pursued, waived or split between the new lots.
- the Lot has unallocated monies. You will need to determine whether these funds will be applied to overdue levies, refunded or split between the new lots.
- the Lot has levies posted but not yet due (future levies). You will need to determine whether this levy is to be split between the new lots. It can be cancelled on this lot unless you are going to expect payment through this Lot.
- The Lot has monies paid against future levies. You will need to determine whether these funds will be refunded or split between the new lots.
Helpful Links -
https://kb.rockend.com/help/cancelling-levy-by-owner
https://kb.rockend.com/help/how-to-refund-a-levy-payment-to-an-owner-in-strata-master
https://kb.rockend.com/help/cancel-an-allocation-receipt-in-strata-master
Reset the number of Registered Lots
With the addition of further lots and 1 made as additional debtor, the number of Registered and Primary Lots will have changed.
This screen is found on the Corp screen, top right hand side.
Edit the Primary Lots field as required.
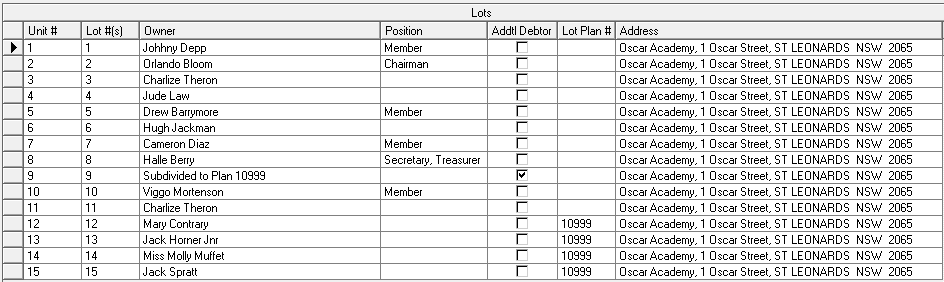
Example 2
Strata Plan 9999 originally had 11 lots. Lot 9 was later subdivided and became Strata Plan 10999 with 4 lots. Normally, these lots will be lot numbers 12 - 15 in Strata Plan 9999.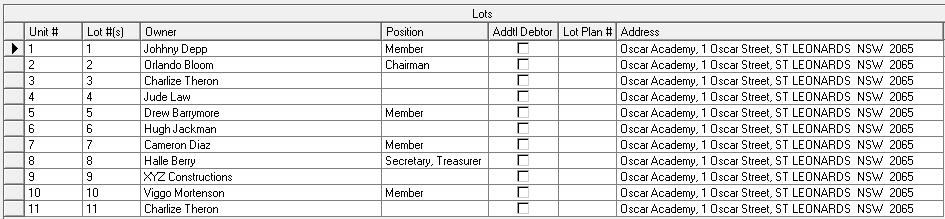
Example 2 follows the same steps with minor points of difference. The steps from 1 to 7 are the same as above.
You will then need to change the owner details as necessary. i.e. Change the subdivided lot (lot 3) to reflect the new strata plan no. (SP 10999) and add owner details into the new lots. The finished Lots appear as below.
Groups
If you are using groups, be aware that -
- you may need to edit your Groups, depending on the kind of changes you have made to entitlements, and
- financial reports for groups may be affected as the groups have changed and the date of the Financial year end and date of subdivision change are taken into account. If, for example, you add a fresh entitlement set for all lots, instead of editing the existing one, your groups will change and impact your reports.